Meredith circa 1982

Wednesday, March 17, 2010

Challah and Bagels and Doughnuts, Oh My!

Oh yeah - and Pizza!!! Can you think of a more carb-o-licious weekend?! I think that our class was the most excited about this past weekends lessons! We've been counting down until Doughnut weekend since we started this adventure on January 9th! But we didn't realize that we would also get to make Bagels and Pizza on the same weekend!

So we started out by making our pizza dough and while that fermented, we got to cook all of the toppings that we wanted to use on our pizza. Another chance to feel like we were culinary students - the school provided every kind of meat and vegetable and cheese you could imagine so we went wild!

While our toppings cooled to room temperature, Chef showed us how to shape our dough into a pizza round. We didn't throw it above our heads like the pro's do, but we used our knuckles and turned really fast circles with the dough to make our crust nice and thin. After that, we topped it with sauce and our toppings.

My first pizza had Italian Sausage, Sauteed onions, peppers and mushrooms and grated mozzarella. Making the pizza was only half of this lesson - the other half was getting the pizza off of the peel (long handled, wooden paddle that you use to slide the pizza into the deck oven) successfully and not tossing it into the back of the oven or getting it into the oven - but upside down! A variety of things could cause this type of messy disaster - if your pizza was too heavy with toppings, if your pizza dough got stuck to the peel, if there was a little speck of sauce on the peel, etc. Luckily, our class did not have any incidents of pizza flippings and everyone was able to get their pizza into and out of the oven successfully!


My second pizza was a White Pizza - no sauce, just cheeses. I used sliced mozzarella, riccotta, peccorino romano, bel paese, and parmesean cheese. Then I sprinkled fresh arugala on top and a little fresh cracked black pepper. I loved this pizza!!!!


After pizza, we made Challah bread and Challah rolls. Challah is one of Roger's favorite breads so I was happy to make this to bring home for him to try. The dough gets it's color from the egg yolks that are in this dough. After the dough went through fermentation and proofing, we learned to braid the dough.


Here is my tray of Challah rolls - we learned severl knots / braids to use and then coated them with egg wash and sprinkled on poppy seeds, kosher salt, white sesame seeds and black sesame seeds. This is before they went into the oven.

Challah fresh out of the oven...


And the rolls...


We also made Foccacia - the thick, flat, italian bread. My partner and I decided to top ours with olive oil and kosher salt and put sun dried tomatoes on half of it.


An "in between bread" on Saturday was this Oatmeal Bread. Another yeast bread - and this one had oatmeal and a little brown sugar in it.


I'm so disappointed that I forgot to take pictures of my Bagels! I don't know how it happened - but I didn't realize it until I sat down to upload my pictures and write this post. Making bagels is a lot of fun - we made the dough, learned how to shape it into the circle shape and then we poached them before putting them into the oven to bake. Poaching gives the bagel the nice chewy texture and baking in the oven completes the cooking process and gives the bagel it's brown color.

Finally, it was Time To Make The Doughnuts!!!!!!!!!!!!!!!!!!!!!!!!!!!!!!!!!!!!!
We made two types of dough - One for Filled Doughnuts and one for Raised Doughnuts. Here is the dough for the Filled Doughnuts - cut out circles with no holes in them. We didn't want to waste a bit of that dough, so we used a smaller cutter to make some "munchkins".


We didn't have large fryers to use, so we heated oil to 350 degrees in saucepans on our induction units and fried our doughnuts there. Here are three of the filled munchkins in the hot tub.


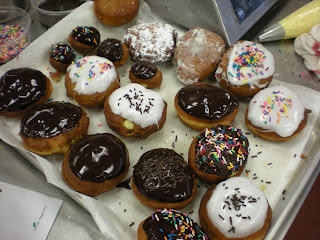
Now you may be wondering what we filled these little yummies with? Well, we made more vanilla pastry cream (like our filling for the Eclairs and Choux Puffs) and we used that to fill the majority of our doughnuts. We had a plethora of jellies to choose from too - but who wants that when you can have vanilla pastry cream?
We dipped our doughnuts into chocolate glaze or fondant and then decorated them with sprinkles.


Next we cut out our raised doughnuts and got those into the fryer pronto!


For this recipe, we coated the warm doughnuts with cinnamon and sugar


Or chocolate glaze...


While these weren't quite as good as Krispy Kreme, they were still a nice treat and a lot of fun to make!


Wednesday, March 10, 2010

Bread!


That's my first loaf of real yeast bread - the first bread we started off with this past weekend was Semolina Bread. This was our introduction to the various stages of working with yeast products and making bread by hand. We learned about straight dough and indirect dough methods and mixed these first breads by hand.

Bread is a lot of fun, but we discovered there is a lot of patience required and bread baking is a very lengthy process! Chef Jeff tried to limit the amount of down time we had by staggering our recipes so that while one dough was fermenting or proofing, we were working on another bread that was at another stage in the process.

Once we were familiar with the process, we moved on to make Nicois Olive Bread and learned how to shape our dough into oblong loafs as well as rounding dough like we did on our Semolina bread.

Next we made Fougasse Provencale which has BACON in it and herbs de provence. You wouldn't believe how excited Pastry students are to get to cook and use Bacon!!!! It was strange to have that smell in our kitchen since we have never really worked with savory flavors before. This bread was really great - nice flavor and how can you go wrong with Bacon inside your bread!

Fougasse is a ladder shaped bread so we formed our dough into rectangles and then cut openings in the bread before it proofed for the last time and was put in the oven.


Saturday afternoon we made a Poolish which is the French name for a wet starter made of equal weight proportions of flour and water and a very small percentage of yeast. We left our Poolish to work overnight and came back to triple the amount we left on Saturday evening.

We used this particular Poolish to make Baguettes. Baguettes take even more time to make than the other breads we made and are very difficult to work with. True French baguettes only contain yeast, flour, water, and salt and only have a shelf life of 6 hours. In a strict French bakery, they would deem baguettes older than 6 hours not-saleable and would pull them from their shelves at the 6 hour mark.

The hardest part about making Baguettes is shaping them into those long rods. It is a tough technique and Chef warned us ahead of time it was difficult and could be frustrating so we knew we were in for an experience! We each had to make 4 baguettes and you can see that they kinda have the correct shape, but not quite!


The one on the very bottom is the first one I rolled - doesn't it look like a snake! : )

Despite their appearance, these baguettes were delicious! Roger and I had French Bread pizzas for dinner Sunday night (because we were overwhelmed with Bread products!) and it was really, really good!

One of the breads we made during our baguette downtime was called Anadama bread and was a strange mixture of flour, cornmeal, salt and molasses (and a few other ingredients) - I wasn't really a fan of this bread but we made this recipe because it only had to proof one time and was made in loaf pans which we had not used before.

It was a very dense bread that had a slight corn flavor too it - but also had a yeast element. The story behind the recipe is that a long time ago, a man came home from working and his wife had not prepared dinner the way she normally did and was not at home. Her name was Ana and supposedly he exclaimed "Ana Damn" and then looked in the cupboards to see what he could scrounge together to eat. He mixed these ingredients together, threw it into the oven and Anadama bread was created.


This next bread was by far my favorite! Chocolate Hazelnut Bread!!!! It had both milk & semisweet chocolate in it and was fantastic!!!! I could see myself making this one again - it was that good.


Here is a picture of all the breads we baked on Sunday.


And last but not least are Bread sticks - we made a Rosemary bread stick that was very tasty. These were relatively quick to make and had a crunchy texture to them - not a big, doughy bread stick like you would have at an Italian restaurant.

And that was weekend 1 of Bread!


Monday, March 1, 2010

Back on Track!

Back in the swing of things! Sorry I’m a little behind with putting up a new post – my school schedule was a little strange the last three weeks but I wanted to get you up to speed before we start our Bread and Yeast Doughs Module this weekend!

After having President’s Day weekend off, we jumped right back into things finishing up our Frozen Dessert work making Bombes. Bombes are like an ice cream dessert, but instead of the custard mixture being churned, you add air to it by incorporating whipped cream or whipped egg whites. We had the choice to make a wide variety of flavors, so my partner and I chose to make Banana, Pineapple Coconut and Raspberry! We were trying to feel tropical on that cold February Saturday morning!

Bombes are layered into flexible molds and then unmolded before presentation. We had fun layering in our three flavors and the combination turned out to be a hit!

I forgot to take pictures of our bombes, but they were cute. I found this picture online - ours were similar but were a pale yellow color.


When we left the ICE building to commute home, we all made sure to not mention we had made Bombes that day – that could get you in a whole bunch a trouble in NYC!


The more exciting part of that weekend was that we began our journey into pastry related production – Pate a Choux!!! Pate a Choux is used to make Eclairs and choux puffs (Crème puffs) and Paris Brest.

The translation of Pate a Choux is “cabbage paste” and it got this name way back when because when the dough would bake in the oven, it often looked like little cabbages when it puffed up. The neat thing about Pate a Choux is that when it bakes, it puffs up and leaves a hollow center that you can fill with all kinds of yummy stuff!


We made Pastry Cream (vanilla & chocolate) and Whipped Cream to fill our Pate a Choux and we also made a Chocolate Glaze and Fondant to coat our pastries. Here I am piping vanilla pastry cream into an Eclair.


We used different pastry tips and techniques to form the same dough into various shapes. This tray has éclairs and choux puffs on it and I’m using a knife to poke a hole in the bottom of each one so that we could pipe our pastry cream inside.

The dessert below is called a Paris Brest - and it is a classic French dessert. The story behind the name is that prior to the Tour de France, there was a bicycle race from Paris to Brest and back to Paris and this dessert was created in honor of that event. The pastry is round and some say represents the circle the actual bicycle route made while others say it represents the bicycle wheel.


Either way, the circle of Pate a Choux is brushed with egg wash and sprinkled with slivered almonds before baking and after it cools, is cut open and filled with pastry cream and whipped cream then dusted with powdered sugar.


These are two Choux a la Creme that I filled with chocolate & vanilla pastry cream, sliced strawberries and dusted with powdered sugar. Nice two-bite treats!


Here is a tray with some of our completed Eclairs and Choux Puffs - we filled them and then decorated them using our Chocolate Glaze or Fondant (not to be confused with rolled fondant used on cakes) and then made them fancy using our cornet skills to decorate with a contrasting color.


You may be wondering where the rest of those choux puffs I was putting holes into ended up since they aren't on this tray? Well, we used the rest of our choux puffs to make mini - Croquembouche!


These were a bit more involved and really fun to make! Martha Stewart has made these mainstream by making large Croquembouche for Wedding Cakes.


Please note - I did NOT make the above picture! I would still be in class working on it if I had because these things take forever!!!


To my fellow Dunkin Donuts fans, these may look like munchkins - but they are actually the little choux puffs, dipped in caramel, filled with pastry cream, and then "glued" together with more hot caramel to form a cone shape.


And that was the last thing we made in Module 1. Our written and practical exams were last weekend and I'm happy to say that I made 50/50 points on our practical! We each had to make Creme Anglaise and Chocolate Souffle and were graded by Chef Jeff on our technique, procedures and final product and had to complete our products at a specific time. It was a bit nerve racking, but now I know what to expect for future practical exams and am happy that I did well.

Tomorrow morning we will start Breads and I'm very excited about it!


Wednesday, February 10, 2010

Report Card

On Friday I got an email from ICE with my grade for Module I - Course 1 and I'm happy to report that I made an A! YAY!

We are well into Mod I - Course 2 and this past weekend was all about Custards! Just when I thought my days of separating eggs for egg whites was over, we make recipes with Yolks as the foundation! More separating....

We started out making Creme Brulee - "burnt cream" - which was fun. It's a rather simple preparation but it's all about getting the right texture and baking them properly. We made a traditional vanilla Creme Brulee but there are tons of flavor options for this dessert.


After the custards cooled, we covered them with granulated sugar


And then torched them to make the "burnt" portion. Here I am in my uniform - taking my torching very seriously!


We had tons of Creme Brulee's to share with our fellow Pastry & Culinary students because we made them in ceramic ramekins and couldn't take them home. We were puzzled because no one really seemed to want them, and then we realized it was because if they took them and ate them, they would have to wash the ramekins! The last thing you want to pile up in your kitchen is extra dishes to wash - so I think Chef was going to give our extras to a recreational class that evening.

Next on the agenda was Bread Pudding - our class made Traditional (vanilla with raisins) and Chocolate.


Not much to report on Bread Pudding - pretty basic. We did line our cups with thin slices of bread and filled the inside with the custard instead of using cubed bread which is how I'm used to seeing it.

Our next custard was Creme Renverse which is basically the French version of Flan. Very tasty!

We made a Caramel to pour into our cups and then poured the custard on top of the caramel. After they chilled we quickly submerged the bottoms into boiling water to melt the caramel and help release it from the mold.


Now that I'm writing this post, I'm realizing how much we did on Saturday! Because after those three desserts, we made Pate Sable which is a sweet crust that can be used as a base for Cheesecake! While those baked and cooled, we made our Cheesecake fillings. The class made a Traditional Cheesecake, Sour Cream Cheesecake and Mascarpone Cheesecake.


We baked our Cheesecakes Saturday so that they could cool in the refrigerator overnight and we could unmold and taste them on Sunday. Unfortunately, my camera battery was dead when we got to class on Sunday so I don't have any pictures of the rest of the things we made on Sunday. My partner took some pictures with her camera, so if she emails them to me, I'll post those pictures.


But just so you know, our Cheesecake turned out perfectly! No cracks, perfectly flat and a nice golden color around the edges. I sent the entire cheesecake with Roger to his office on Monday and it seemed to be well received!


Saturday afternoon we also made Ice Cream bases - which are a custard as well. Thea and I made Chocolate and then churned it on Sunday when we got to use the professional icecream machine! That was a really fun experience - and it is amazing how quickly the ice cream churned - I think our chocolate took about 8 minutes and it made 1/2 a gallon. It was absolutely delish! Tasted like Haagen-Dazs - very chocolately!!!


Interesting fact - ever wonder why a small container of Haagen-Dazs cost the same (sometimes more) than a 1/2 gallon of Turkey Hill / Breyers? It's because the Ice Cream industry has different types of machines to churn their products and the amount of air incorporated varies. So Haagen-Dazs may use a machine that aerates 20%, while Turkey Hill might aerate 50% - so you end up with less of the custard mixture and more air. This is also why these products have a very different "mouth feel" to them and why Haagen-Dazs and other premium ice creams seem much richer. I thought that was a neat fact to learn!


Other flavors the class made were vanilla, cinnamon, coffee, ginger and coconut. Chocolate seemed to be a class favorite! Sunday morning we made things that could be served with Ice Cream in a dessert presentation - pizelle's (like a waffle cone), tulipes (thin wafer cookie), and sauces - raspberry, hot fudge, caramel, chocolate sauce, etc.


While we worked on those recipes, we also made Sorbet. Thea and I made Sour Cherry Sorbet and it was nice to have something with a tart flavor to contrast all of the super sweet cheesecake & Ice Creams we had been sampling. It's a little hard to enjoy Ice Creams and Sorbets to their full extent in February - in NYC - but maybe we will have a chance to make some more frozen desserts once warm weather gets here!


In the afternoon we were able to showcase our creativity by using our Ice Creams, Sorbets, Sauces, Pizelles and Tulipes to plate our own original desserts. Hopefully I'll get pictures of that to post too - it was neat to see everyone's style come out!


This weekend we don't have class due to President's Day so I will have a little bit of a break! If anything fun happens or school related comes up, I'll do a post - otherwise I'll write again in a few weeks!


Wednesday, February 3, 2010

Is my sweet tooth fading?

So this weekend we took a field trip to Gramercy Tavern - http://www.gramercytavern.com/ - to sample their dessert menu and to meet Pastry Chef Nancy Olson. It was great to have the opportunity to meet her and tour the kitchen of such a well known restaurant.

Here are my school pals Pamela and Rebecca before our feasting extravaganza began!


If you visit the Gramercy Taven website, you can see how extensive their dessert selection is. Our group of 14 was seated at 3 tables and each table was served a selection from both the Tavern and Dining Room dessert menus. We started with a cheese plate and breads before the staff brought out our desserts.

I wasn't able to take individual pictures of each dessert, because we were already getting strange looks from the other patrons for ordering nothing but desserts at 12:00 on a Saturday, so I didn't want to draw additional attention to us by walking around taking pictures. : )

Anyway, this was the dessert placed in front of me - Lemon Bread Pudding with Caramel Ice Cream and Salted Almonds:

German Chocolate Cake with Milk Chocolate & Coconut Ice Cream (bottom left) and Slow Roasted Apples with Pecan Crumble and Vanilla Ice Cream (top right):

Chocolate Pudding with Salted Caramel and Brioche Croutons (cup at bottom left), Warm Chocolate Bread Pudding with Cacao Nib Ice Cream (top center) and Apple Crostada with Calvados Caramel and Spiced Walnuts (bottom right):


There were a few desserts that our table did not receive, but our classmates did so they passed them along to us to taste and vice versa.

Those included:
  • Banana Cream Tart with Chocolate Ice Cream and Rum Caramel
  • Pear Sundae with Chip Meringue
  • Peanut Butter Semifreddo with Chocolate Macaroon (one of my favorites!)

The aftermath (shameful, I know). And this is the point where we all felt nauseous and could only think of salty, savory things to help keep our minds off of the sugar sickness we were feeling. Keep in mind, we had not had anything else for lunch besides these decadent desserts!


Before we slipped into sugar comas, Pastry Chef Nancy Olson took us on our tour of the restaurant - Front of House and Back of House (kitchens and other cool stuff). Gramercy Tavern has a separate kitchen just for Pastry which is rare in NYC where space is limited. It was great to see a professional kitchen and get a taste of what a career in that world entails. GT even has a chocolate room that they use to make their own truffles and chocolate components for desserts. We tasted a Pumpkin Ganache truffle coated in Gingersnap Crumbs and it was great!


While we were out of the classroom and in the Union Square area which is a culinary mecca in NYC, Chef Jeff had us stop into the L. A. Burdick Chocolate Shop on 20th Street.

http://www.burdickchocolate.com/

This is the inside of the shop / cafe - really cozy and warm feeling on a blustery winter day!


They are known for their adorable chocolate mice - sounds weird, but they really are cute! Chef bought enough for our class to try them and we saved them to eat later Saturday afternoon when our systems could tolerate more sugar.


And it was after we got back to the classroom that I started to wonder if being a Pastry Student is causing me to not like sweets so much? Ironic, but I guess when you are around such abundant amounts of sweets, and are "forced" to taste them as part of the learning process, your sweet tooth does seem to fade. Hmm.

After the field trip on Saturday, we spent the rest of our time in the kitchen making buttercream and practicing our piping skills so we didn't really make anything.

Sunday was Candy Day and we made recipes that required us to cook sugar to the various stages of consistency - soft ball, hard ball, crack, hard crack, etc.

We made fudge and cooled it on marble slabs using bench scrapers to work the fudge to smooth out the texture and cool the mixture. Felt like I was working at River Street Sweets in Savannah, Ga.


Next we attempted to make Divinity. No pictures because it was a complete flopper for the entire class! Momma always told me that Divinity was very finicky and hard to make, and I believe it now! If a class full of Pastry Students in culinary school can't get it to work, then you know it's hard!

Ours came out as a crumbly mess and was deposited into the trash can shortly after it cooled! LOL!!!

Next was something a little more familiar to me - Peanut Brittle!!!! For some reason this picture reminds me of December in Morrow, GA - wonder why Daddy? : )


Our recipe was different from Daddy's and was just OK. Not to give away family secrets, but the recipe we used in school called for Honey Roasted peanuts and I think they made the final product way too sweet. I think I'll leave Peanut Brittle making up to Daddy because he certainly has a winning recipe and perfect technique!

Next we made Torrone which was new to me . Apparently this is a very popular confection in the Italian community and I can see why! It was delicious and something I plan to make again. The base has honey in it and is cooked to a nougat like consistency and then toasted slivered almonds and pistachios are folded in. Very pretty too!


Lastly, we made more Meringue cookies - this time using the Italian Meringue method and giving us another opportunity to practice our piping skills. Nothing too special about the flavor of these, but they are pretty!


And that's it! I'm giving my sweet tooth a break this week - kinda like resting a sore muscle - to prep for this weekends Creme Brulee, Custards, Bread Puddings & Ice Creams!