So we started out by making our pizza dough and while that fermented, we got to cook all of the toppings that we wanted to use on our pizza. Another chance to feel like we were culinary students - the school provided every kind of meat and vegetable and cheese you could imagine so we went wild!
While our toppings cooled to room temperature, Chef showed us how to shape our dough into a pizza round. We didn't throw it above our heads like the pro's do, but we used our knuckles and turned really fast circles with the dough to make our crust nice and thin. After that, we topped it with sauce and our toppings.
My first pizza had Italian Sausage, Sauteed onions, peppers and mushrooms and grated mozzarella. Making the pizza was only half of this lesson - the other half was getting the pizza off of the peel (long handled, wooden paddle that you use to slide the pizza into the deck oven) successfully and not tossing it into the back of the oven or getting it into the oven - but upside down! A variety of things could cause this type of messy disaster - if your pizza was too heavy with toppings, if your pizza dough got stuck to the peel, if there was a little speck of sauce on the peel, etc. Luckily, our class did not have any incidents of pizza flippings and everyone was able to get their pizza into and out of the oven successfully!

My second pizza was a White Pizza - no sauce, just cheeses. I used sliced mozzarella, riccotta, peccorino romano, bel paese, and parmesean cheese. Then I sprinkled fresh arugala on top and a little fresh cracked black pepper. I loved this pizza!!!!

After pizza, we made Challah bread and Challah rolls. Challah is one of Roger's favorite breads so I was happy to make this to bring home for him to try. The dough gets it's color from the egg yolks that are in this dough. After the dough went through fermentation and proofing, we learned to braid the dough.

Here is my tray of Challah rolls - we learned severl knots / braids to use and then coated them with egg wash and sprinkled on poppy seeds, kosher salt, white sesame seeds and black sesame seeds. This is before they went into the oven.
Challah fresh out of the oven...

And the rolls...

We also made Foccacia - the thick, flat, italian bread. My partner and I decided to top ours with olive oil and kosher salt and put sun dried tomatoes on half of it.

An "in between bread" on Saturday was this Oatmeal Bread. Another yeast bread - and this one had oatmeal and a little brown sugar in it.

I'm so disappointed that I forgot to take pictures of my Bagels! I don't know how it happened - but I didn't realize it until I sat down to upload my pictures and write this post. Making bagels is a lot of fun - we made the dough, learned how to shape it into the circle shape and then we poached them before putting them into the oven to bake. Poaching gives the bagel the nice chewy texture and baking in the oven completes the cooking process and gives the bagel it's brown color.

We didn't have large fryers to use, so we heated oil to 350 degrees in saucepans on our induction units and fried our doughnuts there. Here are three of the filled munchkins in the hot tub.


And the rolls...

We also made Foccacia - the thick, flat, italian bread. My partner and I decided to top ours with olive oil and kosher salt and put sun dried tomatoes on half of it.

An "in between bread" on Saturday was this Oatmeal Bread. Another yeast bread - and this one had oatmeal and a little brown sugar in it.

I'm so disappointed that I forgot to take pictures of my Bagels! I don't know how it happened - but I didn't realize it until I sat down to upload my pictures and write this post. Making bagels is a lot of fun - we made the dough, learned how to shape it into the circle shape and then we poached them before putting them into the oven to bake. Poaching gives the bagel the nice chewy texture and baking in the oven completes the cooking process and gives the bagel it's brown color.
Finally, it was Time To Make The Doughnuts!!!!!!!!!!!!!!!!!!!!!!!!!!!!!!!!!!!!!
We made two types of dough - One for Filled Doughnuts and one for Raised Doughnuts. Here is the dough for the Filled Doughnuts - cut out circles with no holes in them. We didn't want to waste a bit of that dough, so we used a smaller cutter to make some "munchkins".

We didn't have large fryers to use, so we heated oil to 350 degrees in saucepans on our induction units and fried our doughnuts there. Here are three of the filled munchkins in the hot tub.

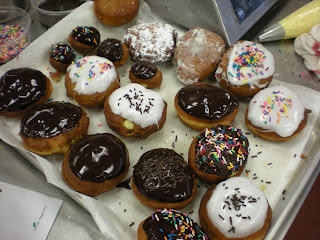
Now you may be wondering what we filled these little yummies with? Well, we made more vanilla pastry cream (like our filling for the Eclairs and Choux Puffs) and we used that to fill the majority of our doughnuts. We had a plethora of jellies to choose from too - but who wants that when you can have vanilla pastry cream?
We dipped our doughnuts into chocolate glaze or fondant and then decorated them with sprinkles.


No comments:
Post a Comment